This week’s guest host is Tracy and she invites us to get unreal, er, ah, surreal. Over the years, I’ve created some images that could loosely be called surreal, but coincidentally I was recently playing with the latest Luminar Neo to create some truly surreal images… but I’ll save those for last.
I looked up the definition of surreal photography before starting this post to be sure I understand the term. From the Adobe website, “Surrealist photography is experimental. Photographers employ manual camera settings, imaginative composition, and unusual photo editing techniques to represent unconscious ideas, dreams, and emotions.”
In her post here, Tracy challenges us to think outside the photography box. She writes, “What do you think? Should we have some fun now? I wasn’t kidding when I said that surrealism was an advertisement for Photoshop. If Photoshop is not your thing, then you can still use old-fashioned photographic techniques to take you beyond reality. Notice the unusual and take a snap. Cut up a photo and re-assemble it, then photograph it again. Use whatever you happen to have at your disposal.”
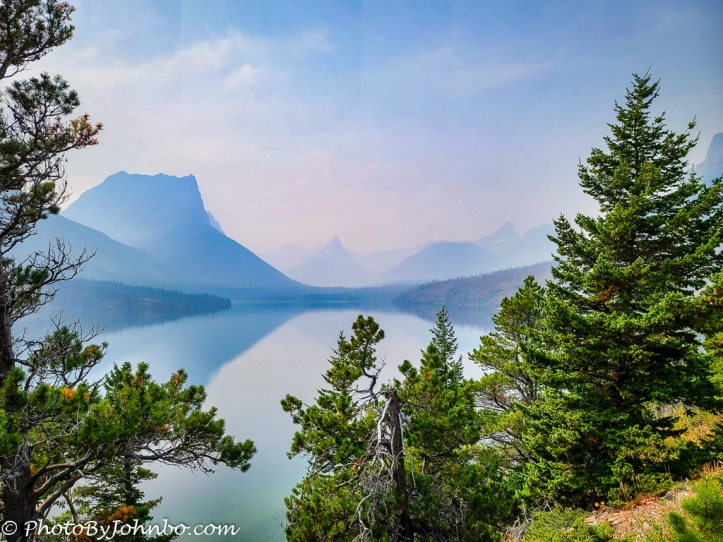
For my opening photo, on our travel to Glacier National Park, the skies were hazy and visibility very poor due to the many wildfires burning in southern Canada. I was at a loss to figure out what to do with some of the images, so I began to experiment and for the image of Saint Mary Lake, I quite accidentally ended up with a surrealistic view of the mountains in the background. Playing with the photo tools in Luminar, I also modified the reflection to better match the background.

For some time, I’ve played with what I call altered reality (thanks to my friend Fred Mast for that term). For this image, I used a sunset beach scene and lowered the exposure, then replaced the twilight sky with a night sky using an image of Comet Neowise that I photographed in Fargo. By using the tools in the sky replacement section of Luminar, I was able to tweak the sunset to blend it quite seamlessly with the darker sky. I was actually surprised at how well the two skies blended together.

On a visit to the “Grand Canyon of the Pacific” on the island of Kauai, Hawaii, I found the low clouds with vast openings letting the sunshine through. I went a bit overboard with processing the colors and created a vivid foreground that is surreal enough that I can almost see the artist’s brush strokes.

Some years ago, I traveled to a nearby community where Engine 361 was on display and doing excursions. I was disappointed that they had already sold out the passenger seats so I had to settle for getting up close and personal with the engine, and I was even able to climb into the cab and visit with the fireman. For this image, I used Nik Color Efex to add a dreamlike mood to this image.

Some time ago, our recent guest host, Jez Braithwaite of Photos by Jez, introduced me to Lensy, his lens ball, a crystal ball that he uses to great effect in many of his photographs. Inspired to try this altered reality, I purchased a lens ball and have used it to create some interesting images. One of my favorites is this fountain captured at one of Fargo’s parks.
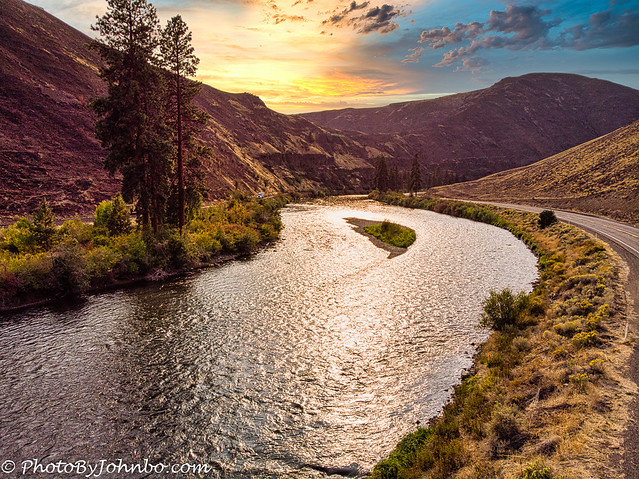
As we traveled through Washington state in 2020, we stopped along the Yakima River to launch my drone. This photo was marred by the midday sun. Yet I liked the composition with the river and the highway creating leading lines in the image. I thought that altering reality to make it a sunset photo would work. The sun was somewhat backlighting the image as you can see by the shadows on the far river bank. I substituted a sunset sky from Luminar’s sky collection and positioned the sun behind the mountain in a location that would ostensibly create the backlit shadows. Then I played with the colors to warm the image to match the sky.
Not all of the images above really meet the definition of surreal as I see it. Still, their altered environment created the appearance that this photographer wanted at the time. The final two images below are what I really consider Tracy meant by “surreal” in her challenge context.
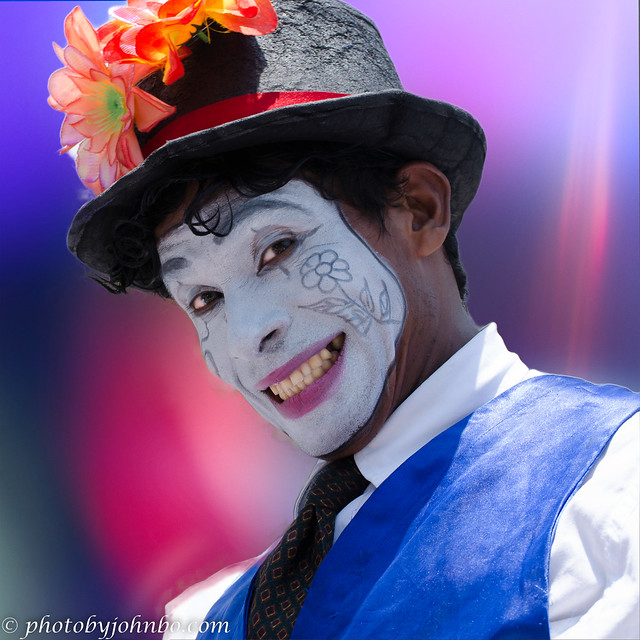
Layering textures and unique backgrounds behind the subject can create an interesting portrait style for a surreal image. When I first started to learn how to use Luminar’s layering features, I used the tutorial portrait image that came with the Neo installation. Once I understood basically how the program handles layers, I found one of the few portraits I’ve taken over the years. I thought this clown we met in Cartagena would make a fitting subject for this surreal experiment. Using a combination of masking techniques and a tip from a YouTube video about using a blank gray background layer to build upon, I constructed the portrait. I was quite pleased with the final result. I should shoot more portraits and process them in a similar fashion.

A recent addition to the tools in Luminar Neo, the ability to work in layers, allowed me to experiment with compositing multiple images into a single altered reality. This image started with a twilight sky and the merging of two landscape shots of the Casa Grande Ruins in Arizona.
In my experimentation, I discovered a special effects company that offers royalty-free images. I downloaded the free-to-use samples to give me some subjects for my experiments. The gun-toting lady in this image is from that collection. After adding her in a foreground layer, I put a ring of light behind her to make it look as if she just stepped into the image from another dimension. At the last minute, I decided to add an image of a blood moon to the background to add to the effect.
As I finished the image, though, something seemed not right, but I couldn’t think what it is. I happened upon a YouTube video this week about creating composites, and it enlightened me. There was no shadow on the woman and the lighting wasn’t right. I spent some time trying the techniques in the video I saw, but I am no artist with a mouse. I used a layering mode to get a shadow, though probably it’s not even close to realistic. I did find a blend mode that allowed the texture to come through. I might have also been able to do this without layers by masking the shadow with a lowered exposure. I also lowered the exposure on the face as the light is behind her. Maybe I’ll stick to processing images and not compositing them. >grin< To view this image or the entire gallery in HD, you can visit my Flickr album here.
Thanks to Tracy for allowing me to showcase my altered reality images. Next week, Sarah from Travel With Me finishes out our July of guest hosts. If you’d like to join in the fun and share your responses to the challenge, you can find the details you need here.
John Steiner

Lots of wows in there John. The first one set the scene and the last one was the topper. Well done 🙂
Thanks, Brian! This was a fun challenge, but then I enjoy them all, don’t I? >grin<
👍😃
Great photos you got here John! The Waimea Canyon, Hawaii and the last photo are my favouries!
Thanks, Aletta!
Very cool.
Nice! I like the train effect
Thanks!
I love the clown and the effect on the steam engine – which Color Efex filter(s) did you use? As to your final composite I think you’ve done a really good job. I must play with Neo’s layers more, if only I could find the time!
On the subject of the shadow, a friend invited me to his camera club’s online talks during Covid and another member of the club did a very detailed tutorial on working with composite images. To achieve a shadow he cut out the image of the person on a separate layer, desaturated it to look shadow like and distorted it a bit, then flipped it vertically and repositioned it to lie in the right place for a shadow. Fiddly, but it’s something you might like to try?
Thanks, Sarah, unfortunately I processed that train image some years ago, and I can’t remember any of the processing specifics.
The thought of somehow manipulating a cutout of the subject occurred to me as well, and if I’d have had to put the entire subject instead of just the lowest part, I might have experimented in that direction.
If I decide to do more of these, I’ll keep that in mind. Luminar can remove the background of a subject and can duplicate layers, so it may not be as fiddly as it sounds.
Wow! I love all of these photos. Beautiful.
Thanks, Dawn!
Great response to this challenge John! Layers is something I do have to get into. My favorite is the train. Next is the clown. Great job.
Thanks, Anne! I had fun playing with layers, and will likely do some more, though it’s a bit out of my usual genre. 🙂
😊
Well John – you were sure all over the map (literally!) on this one! Enjoyed them all but especially the last 2. I think the woman is especially interesting and disagree that the shadows aren’t right, after all isn’t that what surrealism is all about?! Great job.
Excellent surreal images, John. The first and the last are my favorite. Appreciate you taking time to explain and share your experience. Remarkable results!
Thanks, Amy!
An excellent response to the “surreal” challenge John.
Thanks, Anne!
John, I am incredibly impressed by what you’ve achieved here. I think I need some solid time to experiment like you. I fear I may get caught in the rabbit hole though. If only I knew what I was doing (and could remember what I had done, lol). I really like the Waimea Canyon photo. It kind of looks like a stormy sea, don’t you think? Also, your comet Neowise. The blending of the sky is excellent. You fooled me. I have not done any composite photos yet. Cutting them out seems incredibly difficult so well done. I have a couple of suggestions for you to try. Hope you don’t mind. Perhaps you could make your lady a little darker, almost silhouette like, before you drop her in? If I was painting that scene I would create the shadow by dobbing on some dark paint (eg. purple, charcoal) and “pull it down”. You can probably do that with the paintbrush and smudge function or whatever the equivalent is in Luminar.
Thanks for those tips! I do plan some more experimenting with composites. Luminar makes that process a lot easier than I imagined.
I like the idea of more of a silhouette on the lady. I was actually thinking when I finished that I should have lowered the exposure even more to make her a little more mysterious, and reflect the true backlight situation I created.
I hadn’t thought about the Waimea and stormy seas. You nailed it.
I was actually surprised how easy it was to create the comet scene. With sky replacement in Luminar, the blending tools they provided made the melding of the two skies pretty easy.
Kudos to you, John. I was super impressed.
Thanks, again!
GREAT selections and compositions John. Glacier and Waimea are among my faves.
Thanks, John!
These are great John. Hard to choose a favourite
John, this is a great selection of images, you did some wonderful editing on each one.
Thanks, Sylvia. It was a fun challenge experiment!
I liked the misty, pointy mountains in your first photo, John. Looks other worldly.
Thank you! I’m glad you like it. It is one of my favorites.