
Santa Cruz County, California.
This week, I thought I would share a tip for finding exactly where you were when you took those vacation photos. My two “real” cameras, the Nikon and the Sony do not have any GPS tracking ability so sometimes when I’ve stopped at a roadside attraction or, as in the photo above, snapped a picture from the side of the road, I don’t always remember exactly where I was. That’s where my cell phone can come in handy. To make this tip work for you, the first thing that needs to be done is to provide permission for your cellphone camera to use the phone’s Location Services. On my Samsung, it’s called “Location Services”, I am not sure what it is called on an iPhone. Once that permission is granted, the coordinates of the camera location are written to the metadata in the image. Note, however, that could impact your privacy. See my comment below about sharing your final images.
As we traveled north on California Highway 1, I snapped some images along the way. I often use my cell phone for these because the phone geotags the images with the latitude and longitude coordinates of the location. When I get to a place where I am using my Nikon, for example, I often capture a single image with my cell phone that matches one of the images captured on the main camera. That image’s geographic information will help me find the exact location on Google Maps.

The coordinates of an image can be copied from Lightroom and pasted into Google Maps as this screenshot shows. Click on the image for a more readable view. Looking at the details on the left, I can see that I captured this image in Davenport, Santa Cruz County, California. Some images are tagged with a specific street address if the map knows that information.
There are tools on the web where you can upload your image and it will decode the GPS information stored there. Frankly, I tried a couple of them for this article and I wasn’t impressed. The ones I tried are free sources and are therefore peppered with advertising that makes it difficult to understand how the program works. Also, sending my work to some unknown website doesn’t fill me with enthusiasm. If you’ve found a tool to extract Metadata from your photo, feel free to let me know what you’re using in the comments.
Fortunately, Lightroom users can easily extract the information for you if you’d like. That’s what I use. By default, though, GPS information isn’t shown in Lightroom. Here’s how to make it visible…

I’d captured this image on the Fort Bragg to Willits Road but wasn’t exactly sure where it was taken along the highway. You might recognize it from a recent Cellpic Sunday post. I selected the image in Lightroom while in the Library mode. In the toolbar on the right, you can find the GPS data in the Metadata tab. It looks like this screenshot.

Your Lightroom Metadata block may not look exactly like mine as what’s in the block is completely customizable. If you don’t have the GPS data block visible, click the Customize… button and in the window that opens, scroll down to the second section (indicated by a thin separator line) and click the box next to the GPS entry. When you close the Customize window, the GPS field will show up in your image. If the photo has GPS data buried in the metadata, it will be filled in. Click in the box and select the information to copy it, then paste it into Google Maps to see where you were standing when you took the photo.

Many streets and highways are now mapped by those funky Google cars with those rotating cameras on top. As they drive along, they capture images of the highway. Just for fun, I entered “street view” mode at the coordinates for this photo and rotated the street view image to the side of the road. The Google Map view is a wider screen version, but if you note the changing terrain levels and the plants in the foreground, you can see the same image I captured with my cell phone.
I seldom include the GPS coordinates of the final images as I export for publication, but I do find that having the location information available to me makes it much easier for me when it comes time to write the post about the photos shared in that day’s post. I’d love to know if you found this information useful or if you knew about it all along. Please share in the comments below. As always, you can click on any of the images above to view them in greater detail on my Flickr site.
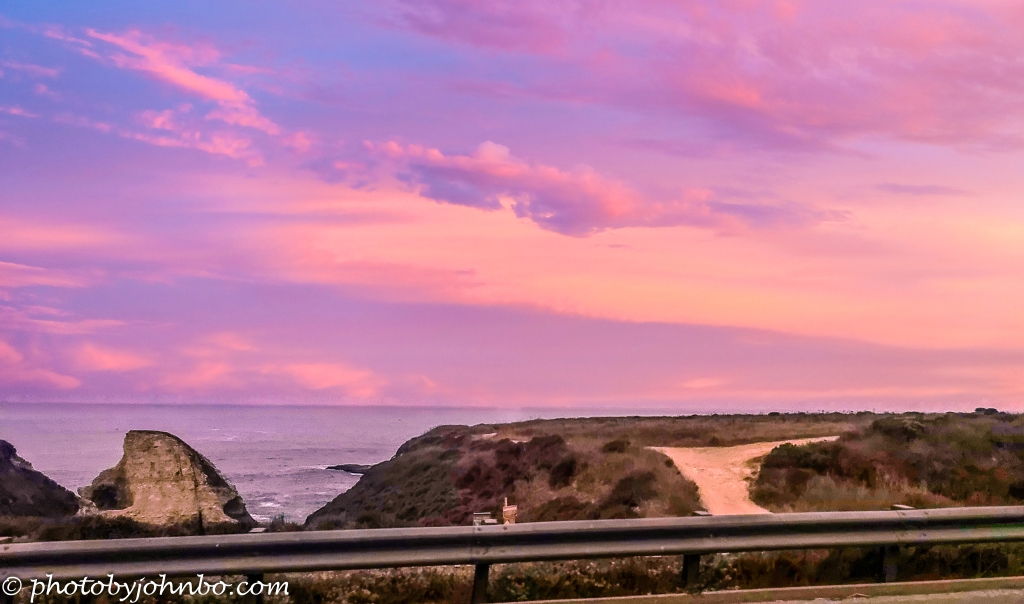
A note about the Cabrillo Coast photo: On a dreary day, I snapped this image of the Cabrillo coast, but wasn’t at all happy with it. I decided to have some fun with Luminar Neo’s sky replacement tool. That’s right, the sky is from a collection of replacement skies available in Neo. The only tweak to the coastline was to use the sky replacement relight function that automatically toned the rest of the image to match the colors in the sky.
John Steiner

Very useful tip. Thanks!
I alway do what you do, since my canon camera I use has no gps.
I always use my cellphone with ‘location on’ along with my regular camera clicks and the clicks which mobile phone gives gps Co-ordinates that I can incorporate in my raw film metadata (as you rightly said this adding gps co ordinates to my raw files just for personal collection).
Lovely capture.
Thank you John.
You’ve reminded me that I can take the GPS data from the cell phone and copy it to the metadata in Lightroom if I’d like. That is something that I didn’t think of doing. Thanks!
I use LR/ACDC/Photoshop elements software to add mobile gps to my raw files
Being a technophobe, I was amazed at how we can use technology to know where we were. But will I use this wonderful info????
If you find it useful at some point, you might, that is if it is on when you need it. 🙂
Clever idea, thank you
Great tips!
Great tip. I love seeing my photos on a map, tracing my trips.
It is really handy to find accurate distance and location information when weeks later I decide to write about the location. 🙂