Macinaw City, Michigan.
This week Sofia challenges us to play with exposure either in-camera or in post-processing. She writes, “For this challenge, it is up to you how you work on exposure. You might, like me, prefer to use shutter speed to change the exposure balance when shooting. You can also play with aperture. Or you can have fun changing the exposure settings while editing. The idea here is to see how the mood of any photo depends on its exposure.” You can read her entire challenge post here.
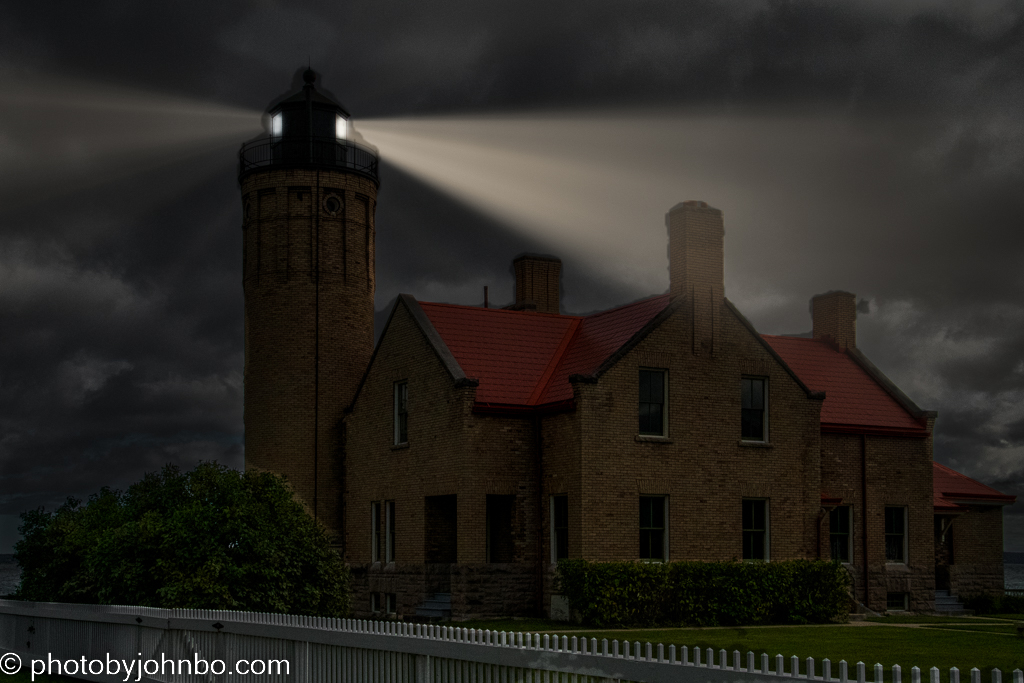
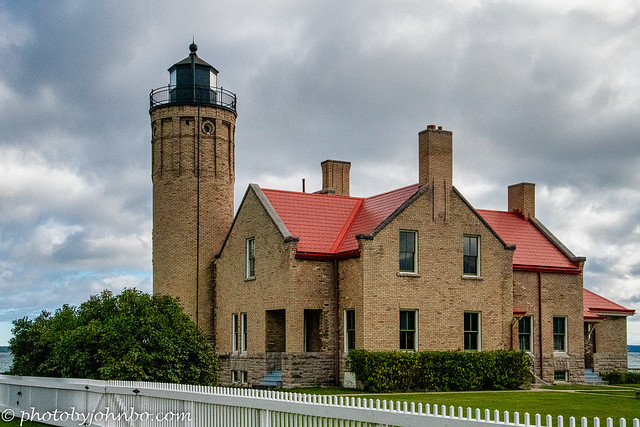
One of my favorite things to do in post-processing is to make day into night. With a little help from Luminar Neo, I was even able to turn the light on in the lighthouse. With the white background on my blogsite, you may like to view the image on a dark background. Click on the photo to view it on my Flickr site. For reference, here’s the “real” image captured mid-day.
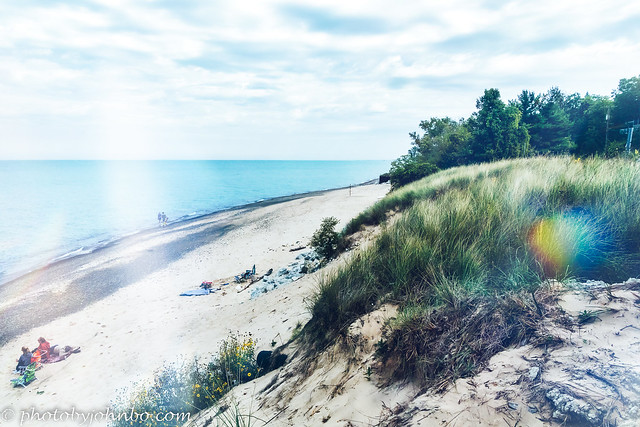
Instead of going “to the dark side” to create a low-key image, sometimes I like to go in the opposite direction to create a high-key image with signs of purposeful overexposure. The image above is a composite featuring an overexposed view of the beach layered with a couple of “light leaks”, images of textures that add an abstract nature to the image.

Black-and-white images can be enhanced by the use of low- or high-key processing. I used a filter in Lightroom to lower the exposure of this image. I then started tweaking the individual color channels to brighten and darken certain parts of the image. I don’t use this technique often, but I thought it would be a fun experiment specifically for this challenge.

If you’ve seen those photos of water that is silky smooth in the ocean, or as in this waterfall example, you’ve seen the results of a long exposure. It’s best to use a tripod for these shots, though I didn’t have one with me when this image was taken in Mount Ranier National Park. I propped the camera on a rock and held it as still as I could. Then I stopped the lens down to f/18 in manual mode and set the shutter speed to 1/4 second. The waterfall was mostly in the shade or I would have needed a neutral density filter to block the light that hit the sensor for a relatively long time. With a neutral density filter, I could have slowed the shutter down to a second or even longer to create an even smoother water flow. Without a tripod, though, a one-second-long exposure would surely have increased motion blur. A close examination of this image on my Flickr site will reveal a small amount of blur as I apparently moved the camera ever so slightly when I pressed the shutter button. I should have used the self-timer.
When I’m not using my cellphone, I most often use exposure bracketing to allow me to create images with a high dynamic range. This sequence of images was captured from the top of the Skylon Tower and features the Canadian falls as viewed from Niagara Falls, Ontario.

Setting up the camera for brackets allows me to capture three images in succession with a single press and hold of the shutter button. The first image is captured with what the exposure meter in the camera thinks is the best exposure for the shot.

The second image in the set reduces the exposure by one stop. You can see the difference in the highlights of the mist in the waterfall when you compare it to the first image.
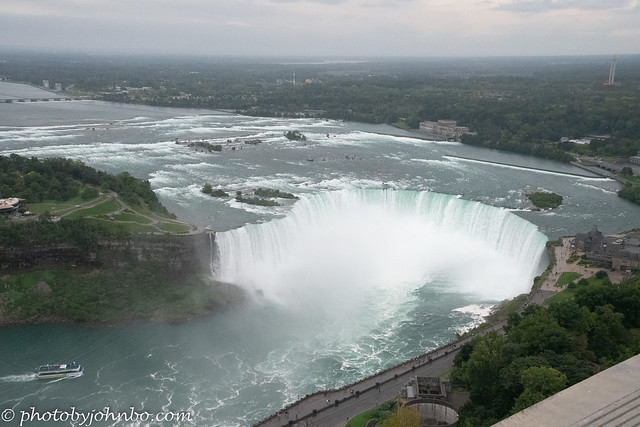
The third image is overexposed. Clearly the highlights in the mist are more “blown out.” However, there is much greater detail in the bluff at the left end of the falls. For several years, I’ve used Adobe Lightroom to merge the three images into a single high dynamic range (HDR) image. Recently, Luminar Neo has added HDR Merge to its collection of tools.

In the merged image, highlights are toned down in the mist and the darker areas in the image left of the falls are clearly visible. Some HDR photographers create 5- or even 7-exposure bracket images. That’s best for high quality enlarged prints, but for my use in blog posts, three-image brackets are typically sufficient.
There’s another reason to shoot brackets all of the time, even when the goal isn’t to create HDR images. When I am unsure of the exact exposure, or the light meter in the camera gets the exposure wrong, I can choose from three images to find one that is most correct for exposure and simply process that one.
Thanks again to Sofia for her take on exposure and how photographers can use shutter, aperature, or ISO settings to help set a mood or tone to an image. For viewing on a darker background, my images for this challenge can be found here in 2K. Next week, it’s Anne’s turn to host the challenge. If you’d like to join in but aren’t sure how, you can read about it here.
John Steiner

The lighthouse image is fantastic, John. Amazing work. I also like the high key beach one, the subject suits that kind of treatment perfectly. HDR are tough for me. I tend to fake them by playing with Lightroom, but I still prefer a softer look. Yours is lovely, tho and it was great to see how you get to the end result.
I used to be in love with the “grungy” HDR look when I first got involved. Some of the early HDR tools increased the image structure to add that look.
Eventually, I tired of the look and discovered that Lightroom’s HDR module creates a more natural HDR. Recently Luminar Neo added an HDR module that is also toned down, but it is still a little more “grungy” than Lightroom’s process so I don’t use the tool in Neo much.
I love your lighthouse image, John. I had no idea you could change the time of day in Luminar. Fantastic. And your HDR example is explained so well. A great post!
Thanks, Patti. I had fun playing with that image. On our trip in September, we saw many lighthouses along Lake Superior. I knew there would be more than one that would get the illuminated at night treatment. You may see more in future posts. 🙂
Lighthouse light effect is amazing!
How did you achieve this in Luminar neo?
What steps you took?
Just curious.
Thanks, Philo.
The conversion was pretty easy in Neo. First, I lowered the overall exposure several stops to turn day into night. I masked the sky and dropped the sky’s exposure even more as it was still too bright.
Then using the brush mask, I selected the two glass areas in the lighthouse and raised the exposure of the glass back to about what looked “bright enough.”
Finally, I used Neo’s Sunrays tool and positioned the artificial sun behind the top of the lighthouse. Neo’s AI knows that the sun can’t shine through solid objects, so it created several sunrays around the top of the lighthouse. I then modified the options in the tool until it created only two rays and made sure they got positioned as if to appear to be coming from the glass areas at the top.
I probably only worked about 10 or 15 minutes on the image from start to finish.
Thank you John for the detailed explanation along with the steps.
I must try this technique when opportunity arises.
Brilliant and you are a creative artist.
Thanks for the compliment, Philo!
👍👍👍
Great post to show the different exposures!
Thanks, Aletta!
Great photos and tutorial John. Educational!
Thanks, John!
I used to do quite a bit of HDR when I had my Nikon equipment John but do less of it now that editing tools are so much more powerful. Your waterfall image is a great example of how important it can be in scenes like that one – the final product is wonderful. The lighthouse shot is amazing when seen in before and after! I’ve not tried Neo but it looks really amazing!
Thanks, Tina.
Sometimes I wonder if I am wasting hard drive space by tripling the image count for every photo I take, then create two more, the HDR DNG file created by Lightroom, and the TIF file that Neo creates when it sends the image back to Lightroom.
Then I think how relatively inexpensive hard drive storage is, so I keep on storing all of the intermediate files.
Love the Lighthouse and the challenge! Here is my entry, https://thrumyeyes291981044.wordpress.com/2022/11/10/lens-artists-challenge-224-exposure/
The two lighthouse images are amazing! Have you tried converting the first one to monochrome?
No, I haven’t. That’s an excellent idea, Hien! You may see that one if a future post.
Great images. I’m going yo try this HDR technique next time as I often have trouble with blown out skies!
Enjoy! There are some good YouTube videos on the process if you want a tutorial.
Beautiful lighhouse image! Thank you for the lesson of HDR. I also like the photo of the nwaterfalls. Excellent examples, John.
Thanks, Amy!
Absolutely wonderful! You are so talented John.Thank you for sharing.☘️☘️
Thank you, Eithnea! I appreciate your compliment!
I love all of these images, John. And these waterfalls caught my attention.
Anita
Thanks!
Great response John. I love what you did to the lighthouse in post. All were beautiful images.
Thanks, Anne!
😊
Excellent post
Thanks!
The night image of the lighthouse is great, John. What a cool effect!
Thanks!!
Oh, I love that lighthouse. Enjoyed your tutorial on exposure bracketing.
Thanks! It was fun creating the effect.
[…] Lens-Artist Photo-Challenge John:…Exposure […]
Great examples!
Thanks, Nora!
Amazing and creative editing. The opening lighthouse photo is incredible! I like the experiment you did on Indiana Sand Dunes National Park picture too.
Thanks! I enjoy doing this kind of experimental processing, and I should do it more often.
[…] Near the southern end of the bridge at Mackinaw City, a museum featuring the Old Mackinac Point Lighthouse (part of Fort Michilimackinac State Park) is a worthy visit. The lighthouse museum closes each winter but it will reopen on May 11, 2023. I featured a couple of views of this lighthouse in a photo challenge here. […]