Josh Adamski is a photographer who has developed a signature style. I ran across his name when watching some videos on YouTube about current and past photographers who have developed a “niche” for their photography. Born in Israel in 1948, he now makes his home in England.
Most of his images feature a sharply defined subject set against a surreal and impressionistic background. If you look online for examples of his work, you will see mostly landscapes and seascapes, though he does have some other genres that exhibit his signature impressionistic style. I thought it might be fun to take some of my photos and attempt to mimic his style. As they say, imitation is the sincerest form of flattery, and I can also say that I am not sure that I was always successful in my experimentation. I started by searching for the effect on YouTube and found several videos that described how to use Photoshop to emulate the effect. The video I used as a tutorial is here.
With Photoshop’s Content Aware subject selection and tools, the YouTubers made it look easy. Though I am renting both Lightroom and Photoshop from Adobe, I use the latter sparingly as I seldom have a need for the tool. It turns out that the latest versions of Photoshop have one component that neither Lightroom nor Luminar Neo has. My experiments would be a lesson in frustration as I had real issues getting the tools to work for selecting and removing the subject. What I learned is that if the subject is complex, I simply couldn’t make those “moving ants” select what I wanted and the content-aware module wasn’t having much better luck than I on some images.

This oil-on-resin sculpture is as real as it gets. It presented a problem typical of content-aware masking for me. Try as I might, I couldn’t get the swim cap which was covered with Swarovski Crystals to be a part of the selection. I had to create two masks, one for the cap and one for the sculpture.
Once the masks are created, they are saved onto separate layers, and the layer with the background and subject is selected. Using the Content-Aware Fill tool, select the subject (in this case, two), and erase the subject. Content-Aware Fill did an imperfect job of erasing, but that’s OK anyway as the other layers cover the imperfections anyway.
At this point, I strayed a bit from the video using the Blur… filter instead of the Blur Gallery. Both tools work in a similar fashion but the gallery allows modes that can create curved angles as demonstrated in the YouTube video link. Within the Motion Blur filter, for all of these images, I chose 500 to 1000 for distance and a degree of angle that seemed appropriate for the image. A slider and a rotating circle allowed me to experiment with the background motion blur adjustments in real time.

When I was done, the swim mask was almost invisible as Photoshop made it almost translucent in the mask. Not being very conversant with Photoshop’s other tools, I ended up loading the image into Luminar Neo and manually generating a mask on the cap, then lowering the exposure. I know this can be easy to do in Photoshop on the mask layer of the cap, but I just couldn’t make it work for me.

My take on this image is that the native New Yorker was walking by a statue completely oblivious to its existence. Surely he probably walked by it a million times before. This subject was easily defined and separated from the background with Photoshop, and the content-aware fill worked perfectly.

Probably this image is the most like Adamski’s work. It was the first one I attempted. I used Luminar Neo’s background removal to create the mask and saved it separately as a PNG. Then I loaded the subject mask image and the full image into Photoshop. I had hoped to make the process an entirely Lightroom/Neo project, but soon realized that I could isolate the subject, erase the subject from the background, complete the layer masks, and so forth, but there is no way in either program to create the motion blur.
Once in Photoshop, content-aware fill eliminated the subject from the background layer and the subject was easily converted to a layer to overlay the background blur that I created. I only set the distance to 500 pixels. The angle was left at 0 degrees to create a horizontal blur.

Photoshop did an excellent job of separating the subject from the background even in the area around the flowers on his hat. Subjects like this make the conversion easy. If you try this technique, and like me, you aren’t that conversant with Photoshop, be sure the subjects you choose are easily delineated from the background. This conversion took only a few minutes.
You might ask why the subject needs to be removed from the background before applying the motion blur. After all, the subject in the background layer is hidden behind the mask of the subject. If you don’t remove the subject from the background layer, when you apply the motion blur, you will see streaks of the subject’s colors spreading into the background destroying the effect you are trying to accomplish.

One day while walking around downtown Fargo, this gentleman walked up to me and struck up a conversation. He asked lots of questions about why I was photographing the architecture around the city. I told him about my interest in historical buildings and he went on to ask me if I would take his picture.
This subject was easily separated from its background. There were a couple of areas where I went in and fixed the minor spots where the mask didn’t quite get the clip just right.

At a Native American Pow Wow, I saw this little guy standing and watching the group performing. His pensive look told me that he might have pre-show jitters. His group would be going on next. The original image captured audience members and folding chairs behind where he was standing. I played with the Angle adjustment in the background layer and the 45-degree setting provided the most pleasing background to me. I set the distance at 1000 pixels.
The subject mask was perfect almost everywhere except around the headdress. As it happened, there was a part of an arm from a spectator right behind his face. The subject selection included a small part of that arm below his chin and behind his cheek. I decided that I could fix the issues in Neo more easily than I could in Photoshop.
Once in Neo, I used the clone tool to select the background color just behind his face and then carefully removed the remnants of the spectator’s arm. I did the same procedure to fill in the area between the two long feathers in his headdress. That area was also selected as part of the subject in the mask layer. Selecting that gray area on the left and below the feathers as a source for the clone allowed me to copy those pixels into the area between the feathers.
All of these images and a couple more examples can be viewed in 2K HD on my Flickr site here. My personal favorites of this attempt at the Adamski Effect are the lady on the beach and the Native American. I’d love to read your thoughts in the comments about the effect and whether or not you might consider attempting your own version of Josh Adamski’s signature style.
John Steiner

Fun experiments John 🙂
Since writing that post a few weeks ago, I added some images to my Flickr site as I figured it is a good way to get more comfortable with Photoshop.
I wasn’t familiar with the Adamski Effect, thanks for the introduction, and you’ve done a great job of imitating it.
Thanks! I’ve found some interesting techniques browsing YouTube for photography videos and learned about photography and the photographers who led us to where we are today.
Ooh, this is interesting! I like the beach photo, clown and Native American best I think. I might have a go myself although not having Photoshop I may find it impossible – let’s see!
Let me know how it works out. I could see devising an alternative to the automatic tools in Photoshop. Thanks, Sarah!
I had a quick try using Photoshop Elements. I selected and cut my subject, putting it on a new layer. Then I returned to the original layer, selected everything apart from the hole where the subject had been, and used the Motion Blur filter to create the background. I then merged the two layers and tidied up a bit. It’s not perfect and I haven’t spent ages with the tidying up stage because I don’t think it’s the most interesting subject, just the first one I found to play with! I put it up on Flickr if you’d like to see it: https://flic.kr/p/2oJuNtN I may have a proper go some time and post the results on my blog. Thanks for the inspiration!
I will look forward to seeing more. I’ve seen some other creative photo editing styles on YouTube, so I will be doing more of these. In fact, the next one is a Cellpic Sunday photo in July.
I’ll look out for that!
Great results on your experiment John! I have Photoshop and use it sparingly. I guess I need to get more motivated.
That video I watched with its example gave me the incentive to start playing with Photoshop a bit more. Now I am a bit more comfortable with its different tool sets. I still am way behind on the learning curve, however. 🙂
😊
You made me curious to try it with one of my images. As I neither have Lightroom nor photoshop (except the old CS6), I‘m trying it with Gimp and Affinity Photo.
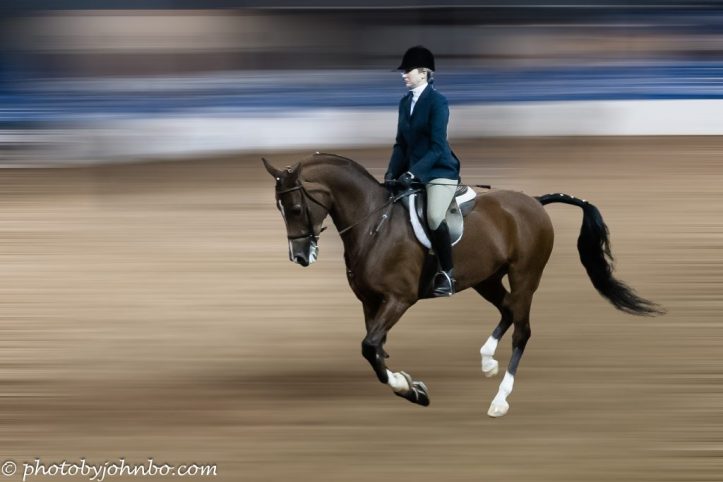
I‘m with you in regards to the young native American. But I like the horseman more than the lady on top of the stone. IMHO the already existing structures of the original background have to have the right colors and structures to part good from great images.
Because I run my own darkroom in the 1980s, I‘m quite sure about the original process. IMHO it was easier in those days than nowadays in digital.
I think you are correct in how that might have been done in a darkroom using film and print techniques.
I didn’t ever try anything like that when I was processing film and printing images, but I think I could develop a technique.
If you give it a try, I’d love to see your images.
Thanks, John. I assume, they will pop up in my blog, if I‘m successful.
I like the young native boy the best. But all of these creations are fascinating . This is not something I am likely to try myself but thank you for your detailed explanations of how you created them.
I understand. It’s a bit of work, especially to get started.
All are beautifully done, John. I need to explore this technique. I also like the Native American image!
After I got past the challenge of first experiments, it got easier to do. Thanks, Amy.
Thank you for sharing your experience and photo skills, as always!
Fun experiment and a great way to eventually find your groove!
I am looking forward to more experimentation. It is a fun pastime and helps to learn more about our powerful editing tools.