
 Monument Valley, Navajo Nation.
First off, a word of warning… this post is more about photography than about Monument Valley. After our first winter in Arizona in 2012, we headed back to Fargo. On the way back, we made side trips to Page and to Monument Valley. Back then, I was just learning how to use my new digital camera and I was using Photoshop Elements to do basic digital processing. Since then, I’ve moved from the Nikon D5100 to the D7000, and now to the D500. Fortunately, back then, even though I didn’t know why, I captured both RAW and JPG files of my images.
I’m glad I did because those RAW images allow me to go back to my first digital SLR images and reprocess them with new photo tools. At one point, a friend and colleague recommended that I look at Adobe Lightroom for RAW image processing. I did, loved it, and hadn’t looked anywhere else until Adobe decided to make it a subscription only tool. I am still using the last stand-alone version they sold and I will probably do so until it fails to function. Hedging my bets, though, I’ve purchased a tool called Luminar 2018 from Skylum Software. It’s got many of the features of Lightroom, but misses some of my favorite functions.
The image below is one of the two Mitten Buttes. The file uploaded for you to view is my D5100’s version of a digital image unprocessed. The only processing applied to this image was a conversion to JPG so I could upload it for you to view. As you can see by comparing it to the opening image, it’s pretty dull and lifeless. It mostly lacks contrast, but there are several other adjustments that could be made to make it more attractive. To me, that’s what digital processing is all about. Putting your own interpretation on a RAW image. If I were a photojournalist, I would ethically be allowed to tweak the image to bring it to life, but I shouldn’t make changes like removing the vehicles from the roadway or otherwise “Photoshopping” objects that change the “newsworthiness” of the image.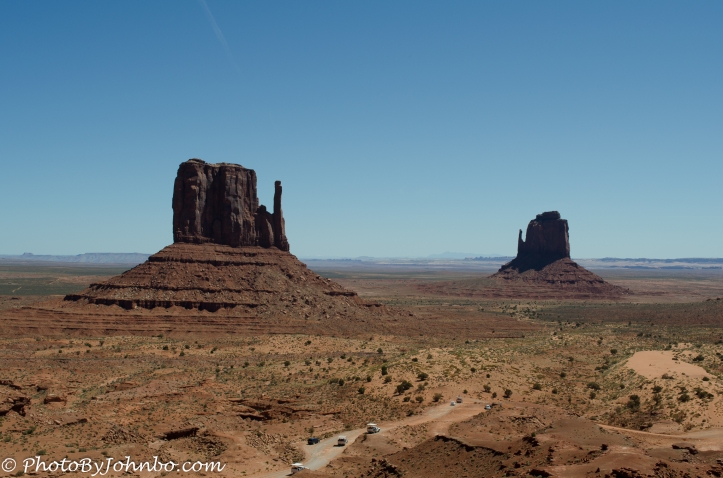
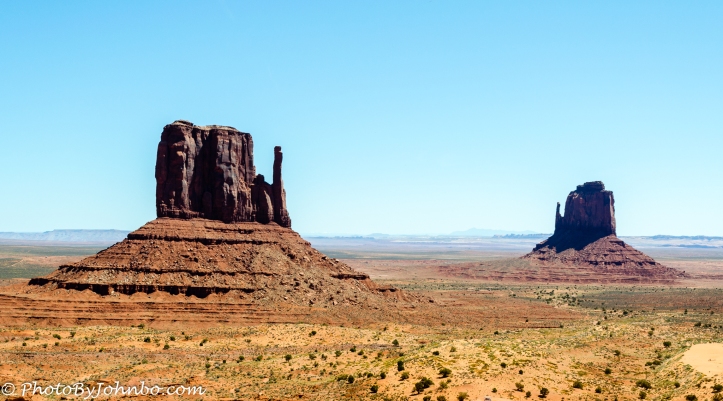
Over the years, I’ve gotten better at bringing out the details in an image via Lightroom, and I’ve really adopted bracketing for my landscape shots where I capture three versions of the image, each with a different exposure level. Then I use Lightroom or another tool to blend them together to make an image with a higher dynamic range (HDR), a technique that brings out more detail in the bright and dark areas of an image. While that technique can be simulated with a single RAW image, it isn’t as effective as having three or more images captured at different exposures. But I digress… The image below, minus any HDR characteristics, is how I would have used Lightroom for final processing in recent months.
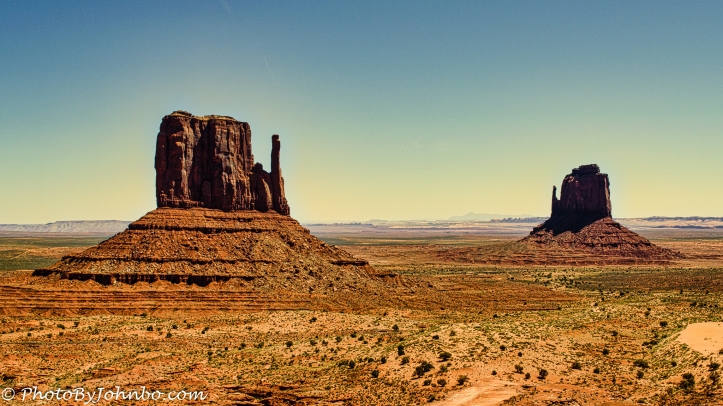
Though I might have pulled down the shade of blue in the sky just a touch more, you can see that basic processing improves the contrast and provides more detail that is hiding inside that RAW digital image. Prior to learning some of the basics of Luminar, I would have probably tweaked this image a little more in Lightroom before I shared it with you, but since beginning to use Luminar, I now export a basic image with minimal processing like the one above and use some of the features in Luminar to bring out a more impressionistic image of the scene. That image is the opening photo in this post. Probably the most notable change is my treatment of the sky, but careful reviewers will note more detail in the foreground and better definition and a slight change of tone in the bases of the buttes.
I don’t have to get this “artsy-fartsy” with Luminar-processed images, but I can if I want. Generally, I only make use of a few key features I’ve come to like for Landscapes in Luminar. There are only a few tools I use in almost every image. Smart Tone attempts to adjust the highlights and shadows simultaneously to lower exposure in the highlights and raise exposure in the dark areas.
The AI (Artificial Intelligence) Filter is a single slider that adjusts several properties simultaneously. It is a powerful tool that I tweak only sparingly unless I want to create a more “abstract” image.
One tool I have in Luminar that is only available in the subscription version of Lightroom is the Dehaze tool. This tool does a remarkable job of bringing down background haze in a landscape shot. I was irritated with Adobe when this tool was only made available for the subscription version. Now I don’t care, Adobe. Nah na na Nah Nah!
Finally, the tool I use to really bring out details, especially in the foreground is called Structure. If I ramp this tool slider to the max, it provides a look that I despise, that garish, over-processed feel of a grunge HDR image. Just a nudge of positive structure, though, adds punch to fine details. Compare the foregrounds in the Lightroom photo above and the Luminar process in the opening image. (Hint: compare them more easily in the gallery below.)
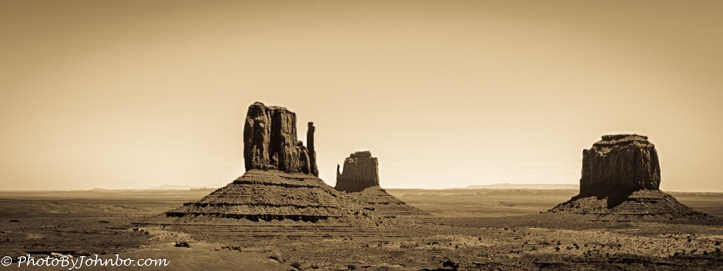
I don’t process all my images in Luminar. One of my Monument Valley favorites is this panarama shot of the Mittens and Merrick’s Butte redone in sepia, all in Lightroom. I like it just the way it turned out. If it ain’t broke… I ain’t fixin’ it. Just for fun, the gallery below includes images processed by my latest skillset in Lightroom followed by the same image with Luminar tweaks. In most browsers, you can click on an image to enlarge it and to scroll through the gallery. I would be very interested in your comments about the difference in processing style and whether you prefer the less “adulterated” Lightroom versions or the “artsy-fartsy” Luminar version.


John Steiner

The Luminar pics are certainly more vivid, the difference is obvious. Even if you just judge by loading time… Our rural internet loaded up the lightroom pics in 1/2 the time. What a bummer about the subscription service, that’s what happened to photoshop & why I’m still using an antiquated version of it.
In fairness to Luminar on loading time, I am now creating higher res images than I used to. The Lightroom pics were older and smaller.
You are obviously a master at the post-processing of your photos, John, and that I believe is due to your artistic talents; knowing what you want to portray with your image even before you’ve pressed the shutter. It really shows in your photos!
I’d love to be able to do more post-processing, but being colour-blind I have to be very careful as what I see as the end-product will likely look totally different to our audience… So, I stick to the basics of enhancing sharpness and brightness if warranted and hope for the best!
Thank you! I really enjoy the post processing. I am still experimenting with a processing style that is “all mine”. The new software has changed what I see in my photos.
Interesting to note your color-blindness. I would never have guessed from looking at your posts. I am envious of your skill at wildlife photography.
Thanks for your comment.
You are as generous with your kindness as always, John.
Have you ever tried DxO Photo Lab?
I am going to have to do that. This post brought me an email from another photographer friend who asked the same question. He loves the quality of output, but since it doesn’t do the file management piece, he continues to use Lightroom. I certainly need to check this software out. Thanks for the tip.